A Quick Guide to Hydroponics
- Did you know that hydroponics is a fascinating technique for cultivating plants without the use of soil?
- Growing hydroponically allows for year-round cultivation.
- Hydroponic growing can actually result in faster growth and higher yields compared to traditional soil-based growing systems.
- If you want to grow hydroponically, you’ll need a few essentials: plants, a container, water, a method to anchor the plants, nutrients, and of course, a reliable light source.
- You can grow vegetables hydroponically in both outdoor and indoor environments.
- If you decide to grow your plants indoors, using artificial lighting can significantly accelerate their growth.
Grow greens, herbs, veggies, and fruit throughout the year.
Hydroponics is a form of horticulture that involves cultivating plants without the use of soil, and it can be practiced in both indoor and outdoor settings. This is an excellent choice for individuals who have limited or no available gardening area, or those who desire to cultivate herbs and vegetables during the winter season.
Hydroponic farming is a compact and water-efficient method compared to traditional soil-based gardening. Cultivating in a hydroponic system eliminates the presence of weeds and pests. Artificial illumination enables year-round hydroponic cultivation, including throughout the winter season.
While hydroponics allows for the cultivation of a wide range of plants, it is particularly suitable for short-season crops and non-fruiting crops like herbs and leafy greens, making them excellent options for indoor production during the winter.
During the summer season, strawberries, tomatoes, cucumbers, and peppers are all excellent options. There is an increasing trend among commercial crop growers to opt for hydroponic cultivation rather than traditional soil-based cultivation.

Core Hydroponic System Components
Growing Systems
One of the most user-friendly hydroponic systems for home use is the “Deep Water Culture” method.
Plants are positioned above a water tank, with their roots extending into the container to absorb water and nutrients.
This hydroponic system is frequently used by small-scale growers, including individuals cultivating for personal consumption and educational gardens.
Additionally, it is the most cost-effective and straightforward to upkeep and enhance.
Purchasing pre-made deep water culture hydroponic systems is an option, but building your own can be just as cost-effective and straightforward.
For this particular system, a container for water and plants can be as basic as a 5-gallon bucket or a plastic storage bin. For hydroponics, it is important to use a clean container made of a food-safe material that won’t release any harmful chemicals into the water. Any water-holding container fitting these criteria will suffice.
Take into account the following factors when selecting a container for your hydroponic system:
Dimension
The size of the plants you wish to cultivate should determine the appropriate size of your container. When growing tomatoes hydroponically, it is important to select a container that matches the size of the mature tomato plant’s canopy.
The information regarding the size of the plant can typically be found on the seed packet.
If you wish to cultivate multiple items in a single container, such as multiple heads of lettuce, a wider container will be required.
Device for buoyancy or flotation
The hydroponic system requires a supporting structure for the plant, in addition to the container that holds the water and nutrients.
A commonly used support structure for plants when using a bucket is the lid of the bucket with holes drilled through it.
If a lid is not available, an alternative method often employed is the utilization of extruded polystyrene, which consists of insulation sheets. You have two options for positioning the polystyrene sheets: either place them on top of the container or let them float directly on the water.
When opting to place the sheets directly on the water, it is advisable to offer additional support, such as PVC tubes, to ensure the stability of the polystyrene sheet as the plants increase in weight.
Considering the cost, aesthetic appeal, and space efficiency
To enhance the aesthetic appeal of your hydroponic system beyond a simple bucket, consider constructing a frame around it, like the Hydroponic Salad Table. This solution offers an effortless way to elevate the visual appeal of your setup.
To enhance the efficiency of your system for simultaneous use of multiple containers, consider utilizing adjustable wire shelves and plastic totes or buckets on each shelf.
Eliminating unnecessary factors can help reduce costs while improving the efficiency and appeal of your setup.
Pots and Substrate
A key component of any hydroponic system is the support structure for your plants.
The most common system for DIY hydroponics is the combination of net pots and a substrate.
- A net pot is simply a pot with holes or slits in the sides to allow the root system to reach the nutrient solution below.
- The net pot should only be partially submerged to allow the developing plant roots to get oxygen.
- Net pots come in a variety of sizes and styles to suit a diverse range of systems.
Rather than filling the net pots with soil, common substrates include perlite, hydroton, pumice, gravel, coconut coir and Rockwool.
The pros and cons of each substrate are listed in the table below. No matter which substrate you choose, soak it in water for 24 hours and change the water before transplanting your seedlings into it. This helps to remove dirt and debris, and in some cases can remove residues that can impact the pH of your system.
If you re-use your substrate, make sure to clean it and sanitize it before planting again to prevent pathogen build-up.
Lighting
Outdoor Hydroponic Lighting: Utilizing Summer Sun
- Ideal Setting: Balconies or patios with ample sun exposure.
- Benefits: Easy and cost-effective for summer growing.
Indoor Hydroponic Lighting: Supplemental Solutions
Necessity of Artificial Lights:
- Common Requirement: Essential for most indoor hydroponic setups.
- Seasonal Consideration: Particularly vital during winter months.
Choosing the Right Artificial Lighting:
- LED vs. Fluorescent Bulbs: Understanding their unique advantages and limitations.
- LED Lights: Energy-efficient, long-lasting, and suitable for a wide range of plants.
- Fluorescent Bulbs: Cost-effective, ideal for seedlings and low-light requiring plants.
Aeration
Passive Aeration: The Kratky Method
- Concept: Utilizing the air gap above water for oxygenation.
- Importance: Submerging only part of the net pot to ensure optimal root growth.
- Key Technique: Keeping roots partially submerged to enhance development.
Active Aeration: Enhancing Hydroponic Systems
Airstones:
- Definition: Porous synthetic stones connected to an external pump.
- Function: Release oxygen in tiny bubbles for efficient aeration.
- Suitability: Ideal for varied root lengths in a single container, ensuring adequate oxygenation.
Recirculating DWC Systems:
- Design: Interconnected containers with a central pump for oxygenated water circulation.
- Advantages: Simplifies pH and nutrient balance management across multiple containers.
- Purchasing vs. DIY: Options for buying pre-made systems or crafting your own using online tutorials.
Advanced Growing Systems
Deep water culture (DWC) stands out as the most straightforward hydroponic setup, but it’s just one of many effective methods. This guide delves into various advanced hydroponic systems, particularly favored by commercial growers yet adaptable for smaller setups.
Key Hydroponic Components: Pots, Substrates, Lighting
Regardless of the system you choose, the basics of pots, substrates, and lighting remain crucial. We’ll explore how these components integrate with more complex systems.
Challenges of Advanced Hydroponic Systems
While offering numerous benefits, advanced hydroponic systems come with their own set of challenges, primarily due to their reliance on mechanical parts like pumps. In events like power outages, these systems risk denying plants access to water, leading to rapid drying. We’ll discuss backup solutions like generators, especially relevant for larger operations, and their practicality for small-scale growers.
A Closer Look at Popular Advanced Hydroponic Systems
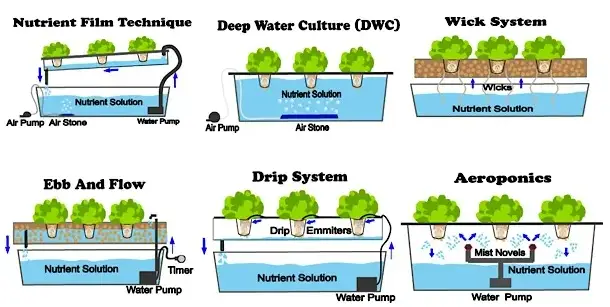
Ebb and Flow Systems:
- Design: Plants in a tray over a nutrient reservoir.
- Operation: Water and nutrients pumped into the tray, draining back into the reservoir.
- Availability: Both pre-made units and DIY options using everyday materials.
Nutrient Film Technique (NFT):
- Structure: Plants in channels with a continuous, shallow water flow.
- Setup: Central reservoir feeding water into angled channels.
- Benefits: Ideal for large-scale operations, centralized water and nutrient management.
Drip Systems:
- Configuration: Similar to NFT but with water flowing through a hose system.
- Application: Increasingly popular in high tunnels for crops like tomatoes and strawberries.
- Variations: Designs with or without a return flow to the reservoir.
Planting
Plant Selection
Plant selection is key to successful hydroponic gardening. In order to choose a plant that will be successful in your system, consider how much light and heat you will have access to.
Plants that do well in hydroponic systems
All year long:
- Lettuce, herbs, and plants in the Brassica family, such as mustards and kale, grow well year-round in hydroponic systems.
- Other leafy greens such as amaranth and swiss chard can also work well.
- Look for seed companies with varieties identified as doing well in hydroponic systems.
Outdoors in the summer:
- Almost anything can be grown hydroponically outdoors in the summer. Tomatoes, cucumbers and strawberries are popular options.
- While it is possible to grow these plants indoors with supplemental heat and lighting, the amount of added heat and light would be cost-prohibitive for most gardeners.
- If you choose to grow these heat-loving plants hydroponically, look for terms like “grows well in pots” or “container variety” when selecting a variety.
Starting Seeds and Transplanting into a Hydroponic System
Start seeds separately and then transplant them into the hydroponic system after germination.
Starting seeds in starter cubes
- You can purchase plant starter cubes or grow plugs online or from some gardening stores.
- The cubes are made from materials such as rock wool or coconut coir and can be directly set into the larger system when your seeds have germinated.
- Starter cubes should be soaked in water before using them and should remain partially submerged (but not fully).
- When the roots have pushed through the bottom of the cube, they are ready to transplant.
- Since different starter cubes are made of different materials, read the instructions on the package before you start.
Starting seeds in soil

- You can also use potting soil and start seeds the way you would if growing them for your garden.
- With this approach, rinse the roots when you transplant them to remove any remaining soil.
Just like when starting seeds for a garden, you’ll need a warm, humid environment. You can start seeds using a container with a lid (such as a plastic storage container) in a south-facing window. If you don’t have a south-facing window, consider buying a heating mat or starting your seeds under grow lights.
Preparing Water
There are three main water quality considerations when growing with hydroponics. All three of these factors contribute to plant health, and are easily amenable if your water is not naturally in the ideal range.
pH (acidity)
Plants do best when growing in water with a pH of 5.4-7. A pH of 7 is considered “neutral”; lower than 7 is acidic and higher than 7 is basic.
- If your pH is either too low or too high, plants may be unable to efficiently use nutrients in the water.
- You can test your water with pH test strips or paper; a 15-foot roll of testing paper costs around $7, and lasts for years.
- Keep in mind that certain fertilizers (ammonium or urea-based) can acidify the water in your system, and others (nitrate based) can make it more basic.
- It’s a good idea to test the pH of your water as it comes out of the tap, as well as after you’ve added your fertilizer.
After adjusting your initial nutrient solution, test the pH of your water every few weeks (commercial growers should test more often, but the pH is unlikely to change substantially in a small-scale system).
If the pH is still too low after adding fertilizer, you can add baking soda to make it more basic. If it’s too high, you can add sulfuric acid, phosphoric acid, or citric acid.
There are also commercial products branded for hydroponic systems that can increase or decrease the pH of your water. Make sure that any product you purchase to change the pH of your water is labeled for food use.
Alkalinity
- Alkalinity refers to the presence of bicarbonate in your hydroponic water.
- High concentrations of bicarbonate can increase the pH of the water, so the pH in systems with high alkalinity (more than 75 ppm) should be tested more regularly, and adjusted as necessary.
- You can also reduce alkalinity by using an acidic fertilizer or by adding acids such as citric, phosphoric or sulfuric acid, or vinegar to your system.
- While testing for alkalinity can be a bit complicated, if you have “hard” water that tends to form a crust on faucets over time, assume that your water is likely alkaline.
- If this is a concern, consider purchasing water for your system; you can purchase reverse osmosis filtered water at most grocery stores using refillable containers for around 39 cents per gallon.
Fertilizing
There are 17 nutrients that plants require to grow and develop properly.
Only carbon, hydrogen, and oxygen are naturally available to plants in a hydroponic system.
Nitrogen, phosphorus, and potassium are considered macronutrients because plants use them in large quantities. If you have gardened outdoors, you are likely familiar with adding these nutrients to your garden via commercial fertilizer or compost.
Other nutrients are often not a concern in traditional soil-based gardening systems because the soil naturally contains many of these essential nutrients. However, in hydroponics, you need to supply not just nitrogen, phosphorus, and potassium, but also calcium, magnesium, sulfur, manganese, iron, molybdenum, copper, zinc, boron, chlorine and nickel.
The good news is, there are many pre-made fertilizers available that have been specially designed for hydroponics.
Liquid vs. dry fertilizers
Liquid fertilizers tend to be easy to use; you simply measure the suggested amount (the label will tell you how much to add per gallon of water) and pour them into the water. However, due to their weight and associated shipping costs, liquid fertilizers tend to be expensive.
Dry fertilizers are much cheaper but are sometimes sold as a multi-part mix. If you order dry fertilizer for lettuce, for example, you may end up receiving 3+ separate bags that you’ll need to mix on-site. This is because the various nutrients have different weights and solubilities, so they store better and face less risk of separating out if they are mixed just prior to use. Other dry fertilizers are available in a pre-mixed form.
Make sure to check the labels to ensure that you have the property quantities and balance of fertilizers.
Determining the correct balance for each crop
The simplest solution to making sure you have the correct balance of nutrients for your specific crop is to purchase a hydroponic fertilizer solution tailored to your crop. For example, you can purchase fertilizer specifically designed for hydroponic lettuce, or for hydroponic tomatoes.
Read the label to see how much fertilizer per gallon is recommended for the crop you’re growing, and keep plants with different fertilizer requirements in different containers.
- For example, if you’re growing tomatoes and lettuce, they should be kept in separate containers because they have different nutrient requirements.
- However, if you’re growing lettuce and kale, and each requires one teaspoon of fertilizer per gallon, these plants could be grown together in the same container.
Maintenance
Changing Water
While some hydroponics publications recommend a “set it and forget it” approach in which the water is never changed, this should only be practiced for short-lived crops such as lettuce, which can be harvested in 6 to 7 weeks.
If you plan to grow something like tomatoes, which require an entire growing season, or an herb that you will continually harvest, changing the water in your system helps to promote plant health as well as food safety.
Partial change-out and refilling
All hydroponic systems have some sort of tank where water is stored; this may simply be your bucket, or it could be a separate tank that feeds the drip lines and hoses in more elaborate hydroponics models. This water will need to be topped-off at some point.
For deep water culture systems:
- When you first plant, the bottom of your pot and substrate should touch the nutrient solution.
- As the roots grow and your plants take up water, the water level in a deep water culture system will drop. This is important for plant health; as the roots begin to develop, they should not be fully submerged in water. Instead, it’s best for only about half of the root biomass to touch the water.
- How often you will need to add water will depend on how many plants you have and how quickly they are growing and using water.
- Try to keep enough water in your system so that about half of the roots are submerged.
For all types of hydroponic systems:
- Any water that is added to the system should include nutrients at the recommended concentration on the label. If your nutrient solution label says to add 1 teaspoon to each gallon of water, make sure that each new gallon of water you add has 1 teaspoon of nutrient solution in it.
- As you add water, make sure to check the pH regularly and make any necessary adjustments.
Complete change-out
If you are growing a longer-season crop like tomatoes, you may decide to switch out the solution entirely once or twice. Nutrient-rich water solutions are prone to algal and bacterial growth, which can be problematic for plant health. This is especially true in passive systems without aeration.
- When changing out your water entirely, consider that any water you’re dumping contains fertilizer. Don’t dump it down the drain, empty it into your garden or into a houseplant.
- After dumping the water, scrub your container with soap and water, rinsing well.
- Add fresh water and nutrients, filling the container to the point at which plant roots will be half submerged.
Managing Insects
While many insects are less of a problem in hydroponic systems compared to growing in soil, you still might encounter insects at some point while growing hydroponically. Insect pressure will depend on whether you are growing indoors or outdoors.
In outdoor systems, hydroponically grown plants will be protected from soil-dwelling insects, but are susceptible to the same foliar insects as the plants in your garden.
Indoors, the most common insect pests in hydroponic systems tend to be very small, soft-bodied insects like thrips, mites, aphids, and whiteflies. If these insects are present, they tend to thrive in indoor settings due to a lack of natural enemies, and a supportive environment (warm and dry). These insects quickly reproduce, so just like gnats or fruit flies that can show up in your kitchen, once present they can become abundant.
The primary insect management tool in hydroponics is sanitation
- Make sure you are not bringing plants in from outdoors, as they may carry insects.
- If you’re purchasing plants from a garden store or nursery, inspect them for insects and pathogens before bringing them home.
- If you’re starting your seedlings at home, make sure to use fresh potting soil or grow cubes, and use clean, fresh water.
- Start with clean containers and equipment, and make sure to empty your system, clean it, and sanitize it between plantings.
- While growing on a staggered schedule (succession planting) allows you to continually harvest from your system, it may be necessary to harvest all of your plants and start over if insect pressure becomes substantial in order to create a break in the insects’ life cycles.
- Maintain as much distance as possible between your hydroponic setup and other houseplants.
Scout for insects regularly, either by visually checking your plants or using yellow sticky traps. If a particular plant is infested, the best management approach is often to simply remove it. For insects like mealybugs, mites, or aphids, which do not typically have wings, you can dab leaves using a cotton ball or q-tip with diluted dish soap and water to remove them.
Biological control (adding beneficial insects or nematodes) is commonly used in commercial hydroponic settings, as well as in educational hydroponic systems such as school gardens. Biocontrol may be appropriate for your hydroponic system if you have it in an enclosed room at home. Beneficial insects can also be released under netted plants.
Managing Disease
While growing in a hydroponic system can protect your plants from many soil-borne pathogens, we still see plenty of disease problems in hydroponics. Some of the most common pathogens we found in a survey of hydroponics farms were powdery mildew, downy mildew, and root rots.
Preventative disease management practices are key in hydroponics
- Buy disease-free seed. If saving your own seed, only save seed from healthy plants, and consider hot-water treatment prior to planting.
- Start with clean materials – clean and sanitize all containers, pots, and tools between uses.
- Wash your hands well before and while working with your hydroponic system.
- If you wear gloves, remember to wash or change them as you work on different plants to prevent moving any disease organisms from plant to plant.
- Keep the growing area sufficiently warm (ideally over 65F), especially during germination.
- Ventilation is key. Avoid planting too close together by following spacing directions on the seed packet, just as you would with plants grown in your garden.
- Adding a fan to your system can also help with ventilation.
- Allow the roots to access oxygen. If you add too much water to your system, the roots will not be able to get oxygen and can develop root rot.
- Your roots should always be touching the water, but should not be fully immersed.
- Check on the health of your plants regularly and remove diseased plants.
Harvesting
Food Safety in Hydroponic Systems
General food safety
Hydroponic systems, especially those with supplemental lighting, tend to be warm environments. Warm conditions combined with standing water can facilitate the growth and spread of bacteria and viruses.
Make sure to wash your hands thoroughly before interacting with any part of your system – this includes planting, changing water, measuring pH, adding nutrients, etc.
Food safety at harvest
Harvest with clean hands into a cleaned and sanitized tote or buckets. If using tools for harvesting (scissors or knives), make sure they are cleaned and sanitized.
Because hydroponic systems tend to be warm, and the water is full of nutrients, any bacteria or viruses that enter the system can reproduce rapidly.
Rinse all produce thoroughly before consuming. If you are pulling the roots out when you harvest, the water might drip onto the other plants during the harvest. Do your best to keep splash down when you are harvesting so that water does not touch drip or splash onto the edible parts of the plants.
Food safety between plantings
Over time, growing plants in a small container of water can lead to the formation of biofilms on the hard surfaces in your system. Think of a fish tank and how it can become slimy on the slides if not cleaned regularly; the same thing can happen to your hydroponic system. These biofilms actually protect and harbor bacteria, some of which might be pathogenic and could cause foodborne illnesses if the bacteria are transferred to the produce via the water in the system.
- After harvesting your plants, clean and sanitize your container and all associated parts (hoses, tubes, substrate material) to remove biofilms and organic material that may be built up.
- First, drain the water and wash the surfaces with a detergent (like Dawn or other dish soap) and water and a scrub brush.
- Then, spray with potable water to rinse the soap and materials away.
- Spray or dunk the components into a sanitizing solution. One option is a chlorine bleach solution, which you can make easily. A common solution is made with 1 tablespoon of household bleach in one gallon of water, which is about 150-200 ppm.
- Do not rinse the surfaces after the sanitizer. Let it air dry.
- Remember to also clean and sanitize net pots, polystyrene boards, and anything else that comes into contact with the water or your plants. Follow the same steps listed above.
Continuous vs Single Harvest
Most herbs can be harvested multiple times, as can leaf lettuce. Simply cut the most mature (lowest on the plant) leaves or stems as you are ready to eat or use them, and allow the plant to keep growing.
You’ll notice plant growth slowing down over time. Most hydroponic growers harvest 3-5 times from the same plants before starting with new seed.
Other varieties such as head lettuce are only meant to be harvested once and will not resprout after cutting.
Lighting Guide
| Type of Grow Light | Pros | Cons |
|---|---|---|
| LED (Light Emitting Diode) | Energy efficient, Long-lasting, Wide spectrum, Minimal heat, Variety of styles | Higher upfront cost |
| Fluorescent | Moderately energy efficient, Cheaper upfront, Variable spectrum | Shorter lifespan, More energy than LEDs |
| Incandescent | Cheapest upfront cost | Inefficient, Short lifespan |
| High Pressure Sodium | Substantial light emission | Suited for large-scale, Older tech, Heat emission, Inefficient spectrum |
Potting Guide
| Substrate | Explanation | Pros | Cons |
|---|---|---|---|
| Rockwool | Most popular medium; Superheated rock and chalk that is spun like wool | Comes in a variety of shapes and sizes, Retains oxygen well, Pore spaces are a good size for root development | Not biodegradable, Can irritate skin, eyes, and lungs, Alkaline - can impact the pH |
| Coconut coir | Coconut husk byproduct | Good water retention, Environmentally friendly, Reusable, Made of organic material | Variable product, Some types must be rehydrated before use, More potential for insects or pathogens |
| Hydroton / LECA | Lightweight expanded clay pebbles the size of marbles | Larger spaces between pebbles, Reusable, Easy to work with and clean | Limited water holding capacity, More expensive than other options |
| Perlite | Ore that has been heated in a kiln and puffed / expanded | Holds on to oxygen well, Reusable, Inexpensive | Non-renewable resource, Small particles prone to blockages, Can be harmful to fish, Can be too lightweight |
| Pumice | Porous volcanic rock | Available in multiple sizes, Lightweight, No super-heating necessary | May be hard to find untreated, Variable product, Sharp edges can cause root damage, Can be too lightweight |
| Gravel | Small rock from a variety of sources | Inexpensive, Drains well, Easy to work with and clean | Heavy, Can impact the pH, Small particles prone to blockages |